Thursday, June 28, 2012

A Watermelon Day.......


It has been soooo hot here.  No relief from the heat.
Nothing is better than watermelon on a day like this.
My mouth is starting to water just thinking about how juicy and sweet watermelon is.
Love it!

Then I remembered some fabric I had.  I got right to work.

And this is what I made - a Watermelon you could wear!

Doesn't it look yummy?


I no sooner listed it on Etsy, that it sold.  I relisted it and it sold again.
I have been sewing watermelons all day.....instead of eating them.


Now, if I could only wear a size 2...........

Nope, not gonna work.

But if you are interested, you will find it here -

Monday, June 25, 2012

Cold hands and freezing fingers......not on my watch!


My little ones love Otter Pops on these hot summer days.  But their little hands get so cold.  Little Stella, who is 2 and a real thinker, got a wash rag and wrapped hers up so her hands wouldn't freeze.  Her dad, my son, Rhett, came up with this Otter Sock!  What a great idea!


No more cold hands.  No more sticky fingers.  (I really hate sticky.  So, it suits me fine.)

We are all happy!
(Now, if we could just get them to pick up all those pesky wrappers)

It is made from plastic coated cotton fabric and insulated with hot pad batting.  No cold is coming through!  Just wipe them clean and have another cold one.

You can find them here -


Quilt Top in just 1 Day Tutorial!

So, here we go - this is the quilt I want to end with..........And, yes, I have only one day to put it together.


This is how I started.  I cut 20 stars out of freezer paper - the same stuff you use to wrap meats in.  Weird thing to be using but it works.  I have actually never used it in the kitchen.  It all goes in my craft room.
So, with my cut out freezer stars I iron them onto the backs of my fabrics, waxy side down.  (The wax is what melts the two together, but not permanently)  Then I cut around each star pattern about a quarter inch around.  I cut the points square and I cut a slice into the valleys.


Then I iron all the 1/4" fabric edges over the freezer paper.


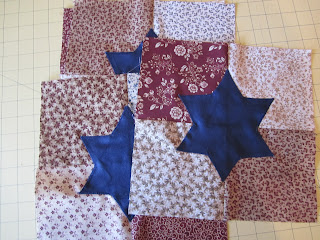
Each star will look like this.  Yes, it does take a bit of time.  But remember, we are doing this in one day, so it doesn't take forever.  And there are only 20, after all.


After the stars are ironed, then pull out the freezer paper and throw it away.  You can actually use the same pattern over a few times.  But I preferred to do 20 separate patterns and do them all at once.


With the freezer paper out of the way, spray the fabric with spray starch and iron all the edges over firmly.  I love this whole process.  The star is PERFECT when you are done.


I have a variety of blue, red and tan flower prints.  Each is cut in 5 1/2" squares and sewn together in four squares.  I put two red with two tans.  And two blue with two tan.  Iron every seam really well and match the edges as best you can.  When you have them all sewn together, square them up so they are all the same size.


Now, the fun starts.  Put a little glue stick on the back of each star.  I love this part.  So many uses for that 'ole glue stick.


Glue a blue star on the red prints and a red star on the blue prints.  Line them all up the same.


Now, the stars will stay in place while you sew them on.  I wish everything were this easy.
Use a wide blanket stitch on your machine.  Yes, it is just that easy.


And look what you have!!  


Before I started sewing them together, I laid them all out on the floor and put them in the order I wanted them.  I wanted the red to alternate with the blue and I didn't want any of the same prints to be touching.  This took me a while to look at it and rearrange it till I was happy.  There are four stars across and five down.
Then I sewed each row across, giving me five rows of star squares.  Then I sewed the rows together.  For me to keep things straight, I leave the squares laid out on the floor except the ones I am sewing.  I can get so confused sometimes.


I pinned a lot when I was sewing the rows together.  I wanted my seams to match perfectly.


Yes, this quilt is sooo me.  I am loving it.  I could have stopped here......but....

It wasn't as long as I wanted it to be so I added some boarders.
I have a two inch red, a four inch tan and a 6 inch blue.  I really loved it at this point but I still wanted to add a few inches to the top and bottom.  It is just not long enough to cover the bed I am going to put it on.


I took all my scrapes and sewed them together.  They were in varying widths and I liked it that way.  Once again, I laid them all out before I sewed them so I could get the look I wanted.


I sewed them on each end and then finished with another 6 in red boarder.
IT IS DONE and I LOVE it.


I didn't want to have a plain back and besides I didn't have enough of any one fabric to make a back.  So, again I pieced all the left over pieces together.


I am just starting to quilt it together now.
I don't think that part will be done in a day..........darn.

But I will let you know when I am done.

Monday, June 11, 2012

The quilt to die for !!!

So, I saw this great looking quilt in a fabric shop one day.  I almost bought the pattern but forced myself not to.  I took a picture of it and thought that maybe....one day.....I would figure it out and make it.  It was sooo me.

I kept the picture on my phone.  I would pull it out every once in a while and dream.


I loved the homeyness of it.  I loved how all the colors came together.  I loved, loved the stars.
I almost thought it looked too hard to make - or too time consuming.

And then, darn it, I was in that same fabric store a few weeks later and there it was.....still hanging on the wall....calling to me!  And now they had kits for it!   All those great fabrics in one little package.....with the pattern included!

So......yes, I bought the kit.  Had to have it.  How could I really walk out without it?  It really spoke to me.  (yep, this store knew what it was doing!)

But then I was almost afraid to make it.  I didn't want to mess it up.  I thought, if I have the kit and pattern, then one day I will make it.

It was like having a treadmill and feeling skinny just because you have it.........

I was at peace!


Monday, June 4, 2012

Bring on my favorite holiday!!


Favorite Holiday - the 4th!  Are you surprised?  I even bore one of my children on the 4th, just to celebrate.

I made this bag about a year ago.  I LOVED it so much.  I tried using other bags but I kept coming back.  It just felt soooo good and it held everything I needed.   A perfect balance of stars and stripes and color.  And the rope tie makes this bag.


You have to have a bag.  Everyone needs a bag.  I would much rather just stick my money in my pocket and have my hands free.  But I like to carry too much stuff.  I mean, what if I break a nail and need a file.  Or, what if I need to write something down.  There are so many things I just might need.  It is nice to have it all there just over my shoulder.

But sometimes I have a different need.  I don't want to take my whole house with me.  I just need a few things.  

So, when I saw this pattern, I knew I was in love again.  It has a body cross strap so I am hands free.   My phone, my wallet, my keys.....and maybe a nail file.....

Once again, it is perfect.............