Friday, July 27, 2012

Polka Dot Pillow in Ruffle Heaven

Wow, I just look at this pillow and my heart melts.  I totally love it!  
(And it doesn't even match anything in my house.)


But I am really into fabric flowers right now.

The ruffles, the flower, the little apple polka dots.

Yep, it's a keeper.


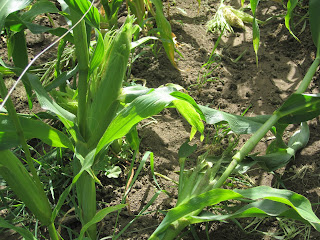
Happy Garden full of Happy Plants...........NOT

So, one day this farmer decided to plant a garden.
He tilled the ground. 
He planted the seeds.
He tenderly watered and weeded his plants.
The farmer was happy.
And so were the plants.


The farmer was anxiously awaiting the day when the corn would be big enough to eat.
Each day he would carefully walk between the rows.  He would tenderly feel the cobs to see how big they were getting.
His joy was almost complete.
"Just two more days", he said.  "And we will have fresh corn on the cob!" He could almost taste it.


But, in the night a naughty raccoon spied this farmers wonderful garden.  He did not think about the farmer.  He only thought of himself.  He did not think about how sad the farmer would be when he saw his garden in the morning.  He could only smell the goodness and helped himself to the tasty corn cobs.


The next morning the farmer cried real tears when he walked through his garden.  He didn't understand why someone would want to destroy his beautiful plants.  But the empty cobs, who were once filled with plump yellow kernels, lay on the ground, emptied of their fruit. 


The garden lays still.  The farmer is sad.
The raccoon is full..........


And I hope he is sick somewhere!


Did you know that on a hot summer day you can actually hear the corn grow..... 
This happy garden is no longer happy, I can hear it crying.


Denim Pant Leg Apron Tutorial

Ha! 
Pant Leg = Apron
I am trying to think this through..........
I guess it is possible.

So, I went to the thrift store and bought the biggest pair of Levis I could find.  I just couldn't see how one leg of a skinny jean could be made into an apron.  So, I thought the bigger the better.  And in a way, I was right.....maybe.

This is how the project finished.  (I always like to to start at the end)


First, I laid out my jeans and cut the leg off - up as high as I could go.  (This may have been a big guy but he was plenty short)


Just one leg here.......see how short it is.  But it all works out.


Cut the leg open to create one big flat piece.  But leave both seams in tact.  Also, see the bottom of the leg.  The hem is still in pretty good shape.  That will be the top of the apron so you want it to be pretty.


Get out your seam ripper and detach one of the pockets.  Cut off the top bulky seams at the top.  You are going to cover it later.


About 2 inches from the sides on the top of the neck, cut an angle down to to where you want the waist to be.  I went pretty much straight down and then curved over.  I didn't want to mess with cutting my trim on the bias so I kept my lines pretty straight.  You can angle it more if you don't mind doing the bias thing.

I just wanted it simple.

Find some cute fabric to bind it all together with.  


My binding trim for the bottom and lower sides - I cut 4 1/2 inch strips, folded over each long side 1/4 inch and ironed.  Then I folded it in half the long way, RST, and ironed again to make a 2 inch double sided binding.

First, I slid it on the bottom edge of the apron fitting it into the 2 inch binding.  I sewed this 1/8 inch from the edge and 1/4 inch from the edge.  If you have ironed your binding exactly in half, you will be catching both sides of the binding as you sew.  You don't have to worry about the raw edges of the apron and binding.  You will cover that with the lower side binding, which comes next.

With the same 2 inch double sided binding that you made, sew it to the lower sides like you did on the bottom.  At the very bottom, fold in the binding, before you sew it, to make a nice finished edge.  Double stitch the edged just like you did on the bottom.  But this time double stitch the bottom edge to close it off.  (like in the picture below)  Once again you don't have to worry about finishing the binding at the waist because you will cover it later.


This is where I would hold up the apron to you to see where you would like the top to come.  Measure from the top of the apron around your neck to the other top side of the apron.  Make sure you can slide your head in freely.  This is how much binding you will leave free when you sew the upper side binding on.

This binding is cut at 2 1/2 inch strips. It is prepared the same way that you prepared the wider binding. Fold under each long side 1/4 inch, iron.  Then fold in half the long way, RST, and iron.  You now have a double sided 1 inch binding.  Depending on how long you need your binding to be, you may have to sew 2 strips together.

Start sewing this binding on the side from the waist up, around the neck, then down the other side.  You don't have to finish the ends again because they will be covered.  Make sure you do the two rows of top stitching.  Don't forget to go around the neck with the topstitching.  This closes it all off.


Now, we are going to tackle the waist ties.  Here you use the wide (2 inch) binding strips again.  Decide how long you want them.  I do one strip the width of the fabric and cut it in half.  

I wanted my tie to be at an angle.  Work with the part where you join it to the apron.  I wanted to cover up both raw edges of the bindings on the sides.  Slide the binding on and fold back the end till you get it how you want it.  This will give you a finished edge. Then top stitch it all down, including the free end.  I went all around on all four sides.


I used the same 2 inch binding to finish the pocket.  Then I sewed the pocket on, following the same stitching lines as the original pocket.


It is done!

But remember how I said that I used the biggest pair of jeans I could find???  The bottom of the apron flairs a bit.  And I like that.  But the top seems a little wide and gapes open when I put it on.  I don't like that.


Here is how I fixed it.  About 2 inches from each original seam and about an inch and a half from the top, I sewed an elastic to the back to gather it.  I sewed the elastic to one end and sewed a casing with a zig-zag stitch.  Then I sewed the elastic on the other end.

It makes a wonderful gather.


Then, of course I added a fabric flower.


A fabric flower makes everything better.

If you have any questions........I am here to answer.

The Ruffle Bag.....I love

So, you plan and prepare for this beautiful thing to enter your life.  You carefully choose the fabrics.  You spend days creating.  Then the adoption comes through.  And you are sad to see it go.

Yep, that is how it feels sometimes.


This bag took me 2 hours just to cut out the fabrics!  Then another day to sew all the ruffles.


The fabric flowers were an added bonus.  They weren't in the original plan.  But I just didn't feel finished yet.


Love the flowers.  

Tuesday, July 24, 2012

Harry Potter Styrofoam Cup Hat Tutorial


I came across this fun idea and thought I needed to spread the word.  I was looking for some favors for a tea party.  I saw this idea of making a little hat out of a styrofoam cup.  I just had to try it.

This is what my final projects looked like.  They are 2 inches tall.

Looks more like a swash buckling hat, right?  But that was all I had to work with.


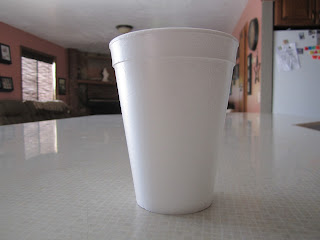
And this is how it started.  This is a 4 1/2 inch styrofoam cup.    They probably come smaller and would make a cute teeny tiny hat.


I put it on foil on a pan and put it in the oven at 250 degrees for about 10 minutes.  At first I didn't take my eyes off the cup, thinking it would melt all over and leave a mess.  But then that got old.


Ten minutes is about right.  But check them once in a while.  If they stay in too long they start to droop to the side - which isn't bad, if that is the look you are looking for.  I also found that you can put many in the oven at the same time.  They shrink down so much that they don't bother each other.

And they turn out to be this little hat looking thing.  It is really amazing.

I wonder who thinks up this stuff.


I decorated mine with ribbon, feathers and buttons - just because that is what I had.


It was really fun.  The table looked cute.  It was just the right touch.

Imagine what you could do with a Halloween party or a Harry Potter Party.  You could melt them a little crooked and make them into little Sorting Hats.   Or how about the Cat in the Hat, or a pirate party, or ........ see what I mean?

Could be a lot of fun.

A Little Bit of Summer Fun - Water Sponge Balls


When you have blistering, hot, melt in the sun days......then you need a bucket of water and one of these.


But if one is good then many will be better, right?


Add in a few of these.............


and let the games begin...........


Stella can get wet when she catches them


And when she throws them.


But isn't that the whole point?

Summertime and the living is easy.......


Wednesday, July 4, 2012

Red, White and Blue, through and through!

So.....this being my favorite holiday and all.  I love the colors.  I love the fireworks.  I love the parades. I love to be with my family.  What's not to love about this day?

I love it so much that I even had a baby 26 years ago today!  And we named her Brittan!  That is true devotion.

I want to share a video that two of my sons did last night.  (and I mean last night, all night)  We had a family gathering and they filmed the fireworks and fun.  Then they were up until 5:30 this morning editing the footage.  The actors are my kids and grandkids.

The soundtrack is by a friend of theirs.  I really love his voice and what he did with the song.

Give it a watch and tell me what you think.

http://www.youtube.com/watch?v=mnOihw7qL5Y